Elementor là 1 plugin thiết kế website WordPress tiện lợi được sử dụng bởi đông đảo website WordPress. Bên cạnh tính năng thiết kế website giao diện kéo thả dễ dàng, Elementor còn tích hợp nhiều tính năng khác, trong đó có Form đăng ký. Bài viết dưới đây sẽ hướng dẫn bạn cách tự động gửi form đăng ký từ Elementor sang Google sheet. Giúp dễ dàng kiểm tra danh sách form và làm việc hiệu quả hơn.
Yêu cầu kỹ thuật – Tự động gửi form đăng ký từ Elementor sang Google sheet
- Elementor Pro: bạn cần có bản pro của Elementor để sử dụng tính năng Form và liên kết với Google Sheet.
- Google Sheets access: Bạn cần có quyền truy cập/ trỉnh sửa trên file Google sheet
Bước 1: Tạo form Elementor
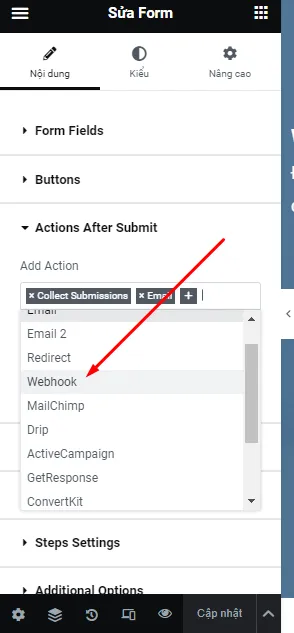
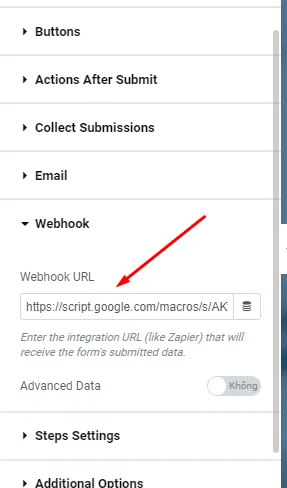
Tạo 1 form Elementor trên website, tại mục Actions After Submit bạn chọn Webhook
Bước 2: Tạo File Google sheet
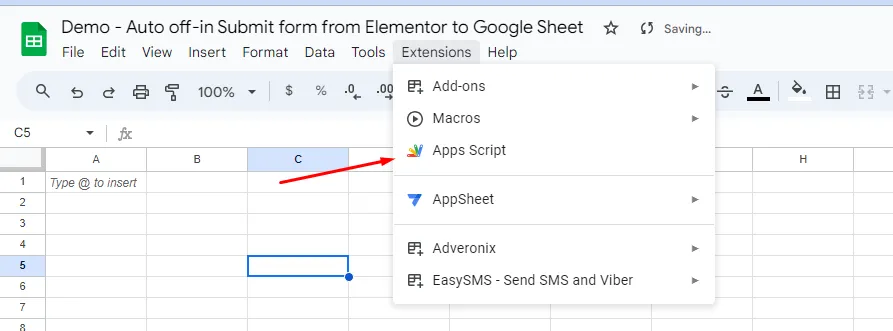
- Truy cập Google drive của bạn và tạo file Google Sheet
- Tại mục Extensions => Chọn Apps Script
Bước 3: Cài đặt Apps Script
Xoá toàn bộ đoạn code trong Apps Script và paste đoạn code dưới đây vào Apps Script
/**
 * Google app-script to utilise Elementor Pro Froms webhook
 * For Usage see: https://github.com/pojome/elementor/issues/5894
 * Promoted: Wolf Marketing 2017
 * Website: wolfmarketing2017.com
 */

/*
In order to enable this script, follow these steps:
 * From your Google Sheet, from the Tools menu select Script Editor…
 * Paste the script from this gist into the script code editor and hit Save.
 * From the Publish menu, select Deploy as web app…
 * Choose to execute the app as yourself, and allow Anyone, even anonymous to execute the script. (Note, depending on your Google Apps instance, this option may not be available. You will need to contact your Google Apps administrator, or else use a Gmail account.) Now click Deploy. You may be asked to review permissions now.
 * The URL that you get will be the webhook that you can use in your elementor form, You can test this webhook in your browser first by pasting it. It will say "Yepp this is the webhook URL, request received".
 */

// Change to true to enable email notifications
var emailNotification = false;
var emailAddress = "Change_to_your_Email";


// DO NOT EDIT THESE NEXT PARAMS
var isNewSheet = false;
var recivedData = [];

/**
 * this is a function that fires when the webapp receives a GET request
 * Not used but required.
 */
function doGet( e ) {
	return HtmlService.createHtmlOutput( "Yepp this is the webhook URL, request received" );
}

// Webhook Receiver - triggered with form webhook to pusblished App URL.
function doPost( e ) {
	var params = JSON.stringify(e.parameter);
	params = JSON.parse(params);
	insertToSheet(params);

	// HTTP Response
	return HtmlService.createHtmlOutput( "post request received" );
}

// Flattens a nested object for easier use with a spreadsheet
function flattenObject( ob ) {
	var toReturn = {};
	for ( var i in ob ) {
		if ( ! ob.hasOwnProperty( i ) ) continue;
		if ( ( typeof ob[ i ] ) == 'object' ) {
			var flatObject = flattenObject( ob[ i ] );
			for ( var x in flatObject ) {
				if ( ! flatObject.hasOwnProperty( x ) ) continue;
				toReturn[ i + '.' + x ] = flatObject[ x ];
			}
		} else {
			toReturn[ i ] = ob[ i ];
		}
	}
	return toReturn;
}

// normalize headers
function getHeaders( formSheet, keys ) {
	var headers = [];

	// retrieve existing headers
    if ( ! isNewSheet ) {
	  headers = formSheet.getRange( 1, 1, 1, formSheet.getLastColumn() ).getValues()[0];
    }

	// add any additional headers
	var newHeaders = [];
	newHeaders = keys.filter( function( k ) {
		return headers.indexOf( k ) > -1 ? false : k;
	} );

	newHeaders.forEach( function( h ) {
		headers.push( h );
	} );
	return headers;
}

// normalize values
function getValues( headers, flat ) {
	var values = [];
	// push values based on headers
	headers.forEach( function( h ){
		values.push( flat[ h ] );
	});
	return values;
}

// Insert headers
function setHeaders( sheet, values ) {
	var headerRow = sheet.getRange( 1, 1, 1, values.length )
	headerRow.setValues( [ values ] );
	headerRow.setFontWeight( "bold" ).setHorizontalAlignment( "center" );
}

// Insert Data into Sheet
function setValues( sheet, values ) {
	var lastRow = Math.max( sheet.getLastRow(),1 );
	sheet.insertRowAfter( lastRow );
	sheet.getRange( lastRow + 1, 1, 1, values.length ).setValues( [ values ] ).setFontWeight( "normal" ).setHorizontalAlignment( "center" );
}

// Find or create sheet for form
function getFormSheet( formName ) {
	var formSheet;
	var activeSheet = SpreadsheetApp.getActiveSpreadsheet();

	// create sheet if needed
	if ( activeSheet.getSheetByName( formName ) == null ) {
      formSheet = activeSheet.insertSheet();
      formSheet.setName( formName );
      isNewSheet = true;
	}
	return activeSheet.getSheetByName( formName );
}


// magic function where it all happens
function insertToSheet( data ){
	var flat = flattenObject( data );
	var keys = Object.keys( flat );
	var formName = data["form_name"];
	var formSheet = getFormSheet( formName );
	var headers = getHeaders( formSheet, keys );
	var values = getValues( headers, flat );
	setHeaders( formSheet, headers );
	setValues( formSheet, values );

    if ( emailNotification ) {
		sendNotification( data, getSeetURL() );
	}
}

function getSeetURL() {
  var spreadsheet = SpreadsheetApp.getActiveSpreadsheet();
  var sheet = spreadsheet.getActiveSheet();
  return spreadsheet.getUrl();
}

function sendNotification( data, url ) {
	var subject = "A new Elementor Pro Froms subbmition has been inserted to your sheet";
  var message = "A new subbmition has been recived via " + data['form_name'] + " form and inserted into your Google sheet at: " + url;
	MailApp.sendEmail( emailAddress, subject, message, {
		name: 'Automatic Emailer Script'
	} );
}
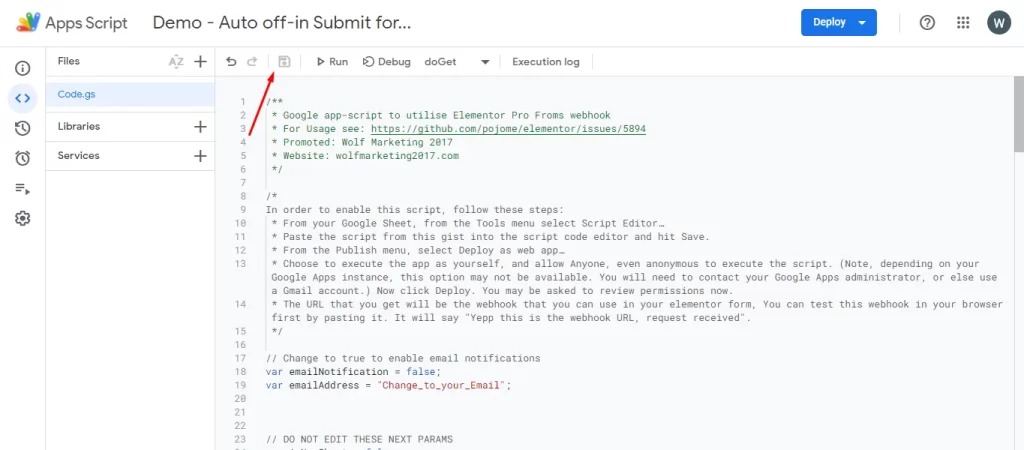
Điền tên và click Save Apps Script
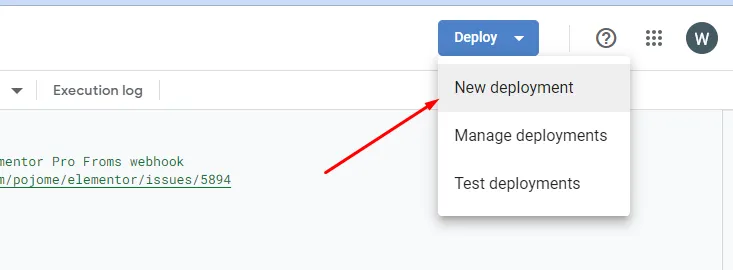
Click Deploy và chọn New Deployment
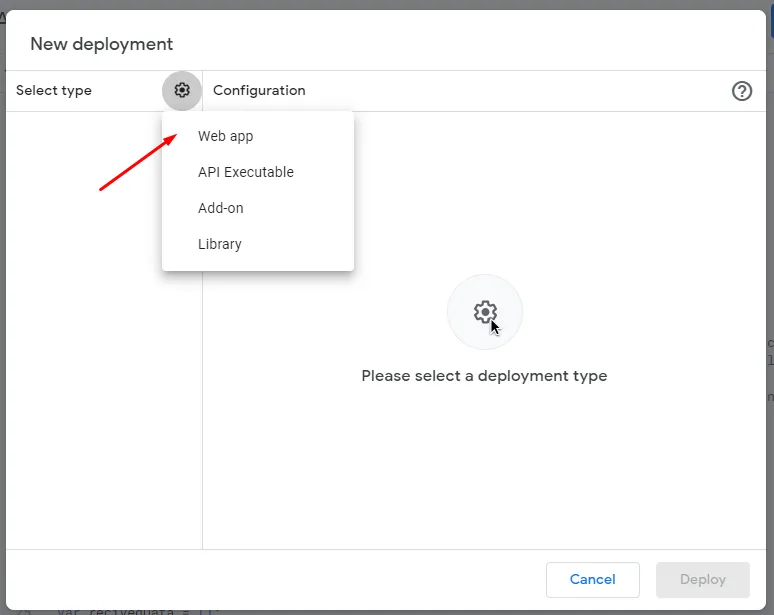
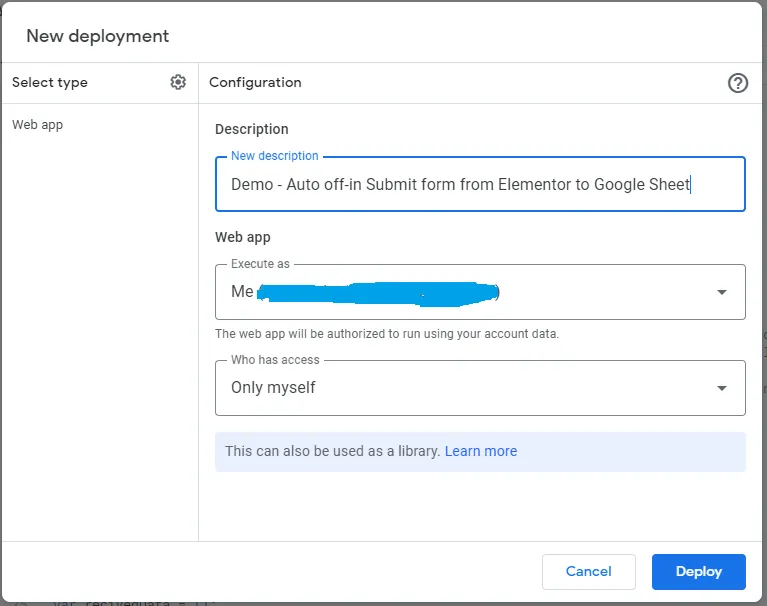
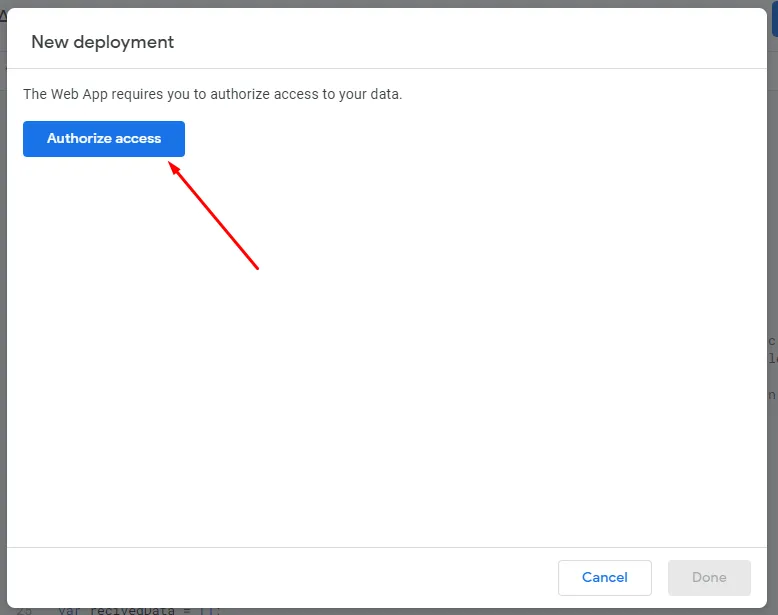
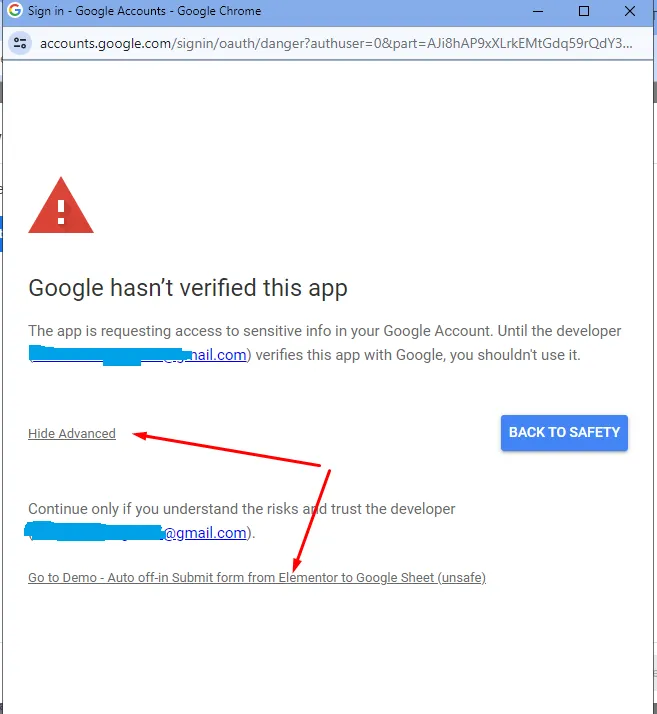
Cuối cùng, Google sẽ yêu cầu quyền truy cập chỉnh sửa file, chọn Authorize access để tiến hành cấp quyền. Trình duyệt sẽ mở lên 1 popup cấp quyền và có cảnh báo bảo mật.
Hãy click vào Advanced và click vào đường dẫn phía dưới để tiếp tục cấp quyền.
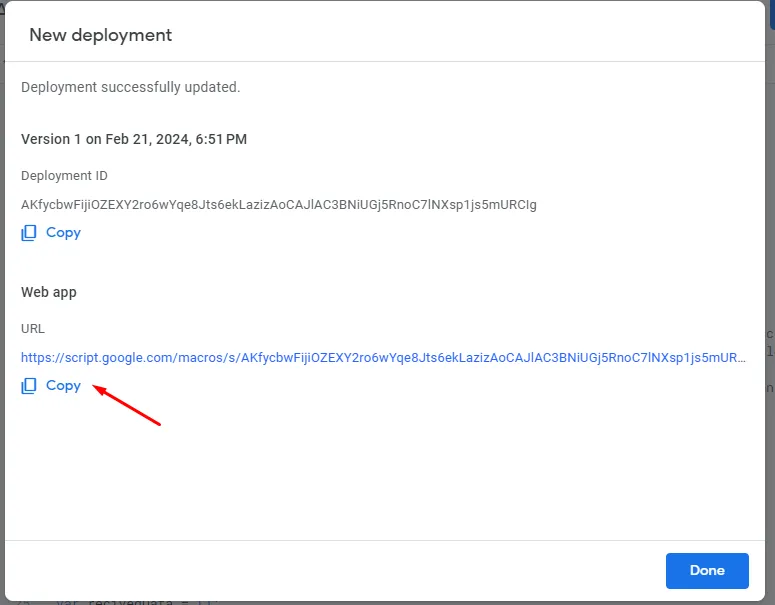
Sau khi Deploy thành công, Apps Script sẽ hiện thông tin như sau. Copy link Web app và paste vào mục Webhook của Elementor form
Cuối cùng, Save Elementor để hoàn tất chỉnh sửa. Đừng quên Test form đăng ký để chắc chắn bạn đã cài đặt thành công Tự động gửi form đăng ký từ Elementor sang Google sheet.
Comment câu hỏi nếu bạn gặp khó khăn trong quá trình thực hiện. Hoặc đặt câu hỏi các chủ đề khác ngay dưới đây nhé!

